| Ultimate CO2 Manager V6.1 |
|
All the features you expect from a professional instrument and much more. The unit was designed for total
CO2 control, day and night. We even developed our own algorithms in order to achieve the highest possible
accuracy and greatly extend the life of your enrichment equipment. Many customers claim a substantial
savings in gas compared to other units available in the marketplace including our previous V5 model.
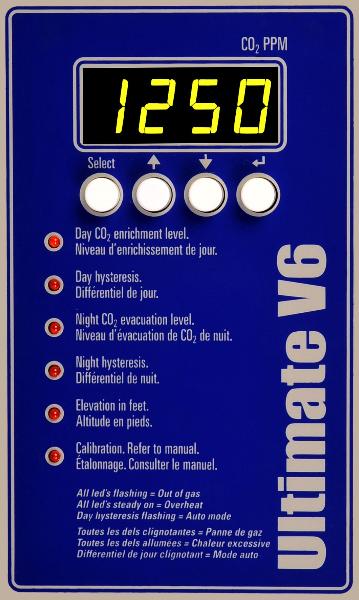
- Continuously monitors and displays the ambient CO2 concentration to 5000 PPM. (parts per million)
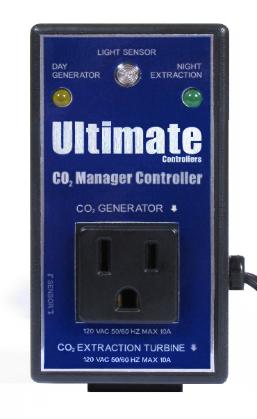
- Controls the grow room daytime CO2 concentration by automatically activating burners or emitters as required. User selects
enrichment level and hysteresis value. The unit is shipped at 1400 PPM with 50 PPM hysteresis. Will activate your enrichment
system whenever the CO2 concentration falls below 1350 PPM (1400-50) and shut off whenever it reaches 1400 PPM. - The CO2 Manager V6 is the first controller ever to offer two separate proprietary algorithms to control the daytime CO2
concentration in the grow room automatically. One algorithm for bottled carbon dioxide injection, burners with continuous pilots, DSI
piezo type ignition and another for gas burners using Honeywell Smart Valve with intermittent electronic pilot. - The algorithm for bottled carbon dioxide will calculate the amount of CO2 required to maintain your target every two minutes.
Incredible precision control often to 10 PPM of target by keeping to short injection periods. Also helps to prevent freezing of gas
emitters. - The algorithm for burners with intermittent electronic pilots will calculate the amount of CO2 required to achieve target every 10
minutes and fire burners accordingly. The hysteresis will be what the grow room consumes in 10 minutes or so. By keeping to 5
injection periods per hour the burner’s gas controller and electronic pilot should last for several years. - Controls the grow room nighttime concentration by automatically activating an exhaust fan/turbine as required. User selects the
nighttime maximum level and hysteresis value. The nighttime level is the ON value. Hysteresis value is the difference between the
ON level and the OFF level. The unit is shipped at 600 PPM and 20 PPM hysteresis. Will activate your exhaust fan whenever the
nighttime CO2 concentration rises above 600 PPM and shut off when it falls below 580 PPM. - High temperature safety shut off with visual warning if grow room temperature exceeds 105F/40.5C. Automatically resumes when
temperature falls below 95F/35C. - Automatic shut off when out of gas to preserve equipment. Warns user by flashing all LEDs. Push enter key to resume.
- Supports any burner or regulator/emitter.
- Supports a 12” turbine for exhaust.
- A light sensor automatically selects day or night operation mode. Always in sync with your HID lighting.
- The patch cord connects with your ventilation system if any and interrupts CO2 enrichment when activated.
- CSA, CEC and NEC compliant for your safety.
- How to change the day target concentration level
- To change/view the daytime PPM target level push and release the Select key until the red led next to Day CO2 enrichment level is
lit. The display indicates the current level. Select a new level using the UP/DOWN keys. Push the enter key when done to record the
change and resume operation. The controller will now activate your burners/emitters according to your new set point.
- How to change the daytime hysteresis value
- How to select the Auto mode
- To change/view the daytime hysteresis value push and release the Select key until the red led next to Day hysteresis is lit. The
display indicates the current value or Auto. Select a new level between 10 and 400ppm or Auto mode using the UP/DOWN keys.
Push the enter key when done to record the change and resume operation.
- How to change the nighttime CO2 evacuation set point
- To change/view the nighttime evacuation level push and release the Select key until the red led next to Night CO2 evacuation level
is lit. The display indicates the current set point. Select a new level using the UP/DOWN keys. When done, push the enter key to
record the change and resume operation. The controller will now activate your nighttime exhaust fan whenever the concentration
exceeds your new set point.
- How to change the nighttime hysteresis value
- To change/view the nighttime hysteresis value push and release the Select key until the red led next to Night hysteresis is lit. The
display indicates the current value. Select a new value between 0 and 400ppm using the UP/DOWN keys. Push the enter key when
done to record the change and resume operation.
- How to record elevation
- The unit comes calibrated for operation at sea level. If you grow at higher altitudes record your altitude from 100 to 9,900 feet to
automatically compensate for the higher elevation. To view/change the elevation push and release the Select key until the red led
next to Elevation in feet is lit. The display indicates the current elevation in feet. Select a new altitude using the UP/DOWN keys.
Push the enter key when done to record the change and resume operation.
- How to Calibrate
- The unit is factory calibrated and should require no calibration for several years. You can calibrate the unit using fresh air as
reference. Bring the sensor outdoors, away from direct sunlight and only when the temperature is around 77oF/25oC. Let the unit
operate for at least 10 minutes and until the reading stabilizes. If the reading is between 350 and 450 PPM the unit does not require
a calibration adjustment. If the reading is under or over push and release the Select key until the led next to Calibration is lit. Use
the UP/DOWN keys to adjust reading to 400. Do not exhale on the unit during calibration adjustments. Push and hold the enter key
for 5 seconds or until the led goes off and unit resumes operation. Let the unit operate another 10 minutes to ensure display is
stable at 400.
- How to select the auto mode algorithm for your enrichment generator
- Push and hold the up and down keys until CO2 or burn appears in the display. Release the up and down keys. With the up or down
key select the mode corresponding to your enrichment generator. Select CO2 for bottled CO2, DSI (direct spark ignition piezo style)
and burners with continuous pilots. Select burn only for burners using a Honeywell Smart Valve with intermittent electronic pilot such
as Ultimate, Blu Ox, Grozone, Plug n Grow. Push the enter key to record your selection and resume operation.
- How to reset the Auto mode
- Push and hold the up and down keys until CO2 or burn appears. Push the enter key. The controller will reset and restart operation.
- XPRESS Service
- Your Ultimate CO2 Manager should deliver many years of reliable operation. Should your unit require servicing please return it to
the point of sale or call Ultimate Controllers to obtain an authorization number and shipping instructions. Repairs will usually be
returned within 2 business days of reception by courier service or Canada Post.
- How organisms acquire energy and the role of CO2
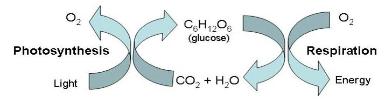
- All organisms need energy to live. Photosynthetic organisms, such as plants, can capture energy in the form of light and use it to
convert CO2 into carbon compounds that can serve as a source of food and as a form of stored energy. These organisms are
known as autotrophs or self-feeders. Autotrophs must break down carbon compounds to release the energy they contain to sustain
their metabolisms. This break down process is called respiration and it occurs at all times in all living cells of all organisms. The
process of photosynthesis is the opposite of respiration, taking energy from light and using it to convert CO2 and H2O into organic
carbon compounds, such as sugars, while respiration breaks down these organic carbon compounds back to CO2 and H2O,
releasing energy in the process. What a wonderful machine that ensures energy is available at all times to sustain life. These
competing processes are illustrated below:
| Features |
- Light energy is taken in by photosynthesis with an increase in biomass as CO2 is fixed or absorbed. Energy is lost as heat from
respiration and biomass is reduced as CO2 is released. As long as CO2 uptake by photosynthesis is greater than CO2 loss by
respiration, the plant will continue to grow. This is the concept of the Net Primary Production. Plants do photosynthesis only when
light is available. Plants do respiration all the time, light or dark. A plant must therefore produce sufficient biomass to sustain life and
provide for growth during light periods.
It gets a little more complicated when you consider the concept of biosynthesis. The simple sugars that plants make during
photosynthesis are used as raw materials in the enzyme reactions that produce compounds like complex carbohydrates (starches
and cellulose), proteins, fats, lipids and nucleic acids. All these enzyme reactions require energy in the form of the ATP that is
produced by the plant’s mitochondria in aerobic respiration. All the chemical compounds that are produced by biosynthesis and are
retained by the plant make up the biomass of the plant. Only about 10% is retained as biomass, 90% is lost through respiration. It is
therefore vital to provide champion plants with conditions that promote efficient photosynthesis and respiration rates especially at
night. There are several factors to consider. Photosynthesis requires light, water and CO2. Increasing the level of CO2 available to
the plant will dramatically increase biomass providing there is enough light and water. Temperature and humidity also affect
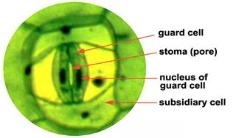
photosynthesis. Hint: Peak photosynthesis activity occurs around 25oC/77oF. If too hot, plants guard cells deflate and close off the
stomas (pores) to prevent excessive water loss through transpiration. Nighttime respiration can be inhibited by high levels of CO2
which also cause the guard cells to deflate and close off the stomas. It is important to keep CO2 levels under 1000 PPM and
preferably around 600 PPM to promote a healthy respiration rate by keeping the stomas wide open for an unrestricted gas exchange
(inhale and exhale). It is common to find levels of over 1500 PPM at night in sealed grow rooms. Remember that plants, like humans,
breathe all the time and produce CO2 as a byproduct of respiration. During the day photosynthesis absorbs all that the plant exhales
and much more so the tendancy of the grow room during the day is for the CO2 concentration to go down. That is why you need to
produce CO2 during the day to supply the photosynthesis process. At night when there is no photosynthesis to absorb CO2 the
tendancy is for the CO2 concentration to rise in the grow room as a result of the plants exhaling CO2. Levels over 1000 PPM begin to
close off the pores and at 1500 PPM nighttime respiration is inhibited. Plants will be droopy and limp at daybreak. Like going to sleep
with a bag over your head, intoxicated by excess CO2. This condition is especially noticeable in dense grow rooms. It is therefore
important to vent your grow room whenever the nighttime CO2 level exceeds 600 PPM.
| Why extract excess nighttime CO2 |